Running ImportQIF Conversion
Special warning the following options in Quicken 2015 to 2016 R7 (fixed in 2016 R8) causes problems for QIF imports please turn them off. See at the bottom of document about the details:
Automatically add downloaded transactions to registers
Automatically add downloaded transactions to investment transaction lists
Warning for Starter Edition
You have to create at least one cash account in Quicken, for the QIF import to work. It doesn't matter if you are going to import into that account or not. This is needed because the Starter Edition doesn’t have a <All Accounts> like the other editions have.
Once ImportQIF has been setup on the Setup Tab and a file is loaded the Run Tab will look like this:
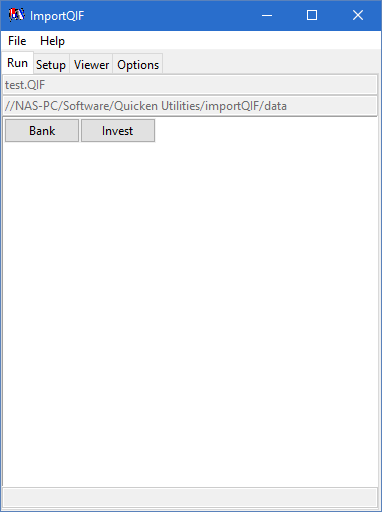
The first line under the tabs is the name of the file loaded.
The second line is the path to that file.
At this point if you press one of the “account” buttons the conversion will begin. The resulting QIF file will be put in a file called Converted.QIF on your desktop.
The second line is the path to that file.
At this point if you press one of the “account” buttons the conversion will begin. The resulting QIF file will be put in a file called Converted.QIF on your desktop.
Please note that if you have the auto import option on, you should have Quicken running BEFORE pressing the “account” button. Also if you are using Quicken 2010 or below you shouldn’t be on the portfolio view. The auto import into Quicken and CSV/Excel/OFX/QFX conversion are advanced options and after the trial period you will have to pay for a license for this computer for it to work. Currently OFX/QFX conversions are not supported for investment or loan (liability) accounts.
If you are prompted by Quicken to create an account when you intended to import into an existing account then you typed in the wrong account name into ImportQIF when creating the account button.
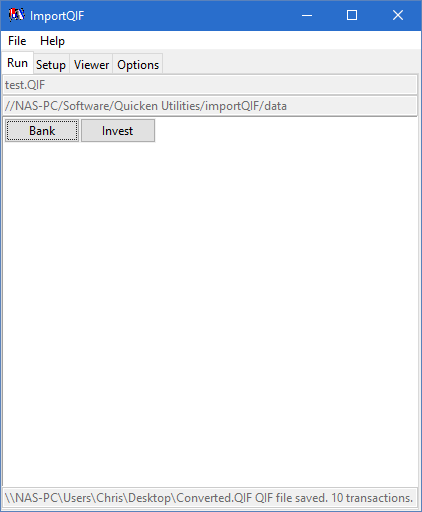
After the Converted.QIF file is saved it will say that is saved on the last line of the Run Tab.
If you are prompted by Quicken to create an account when you intended to import into an existing account then you typed in the wrong account name into ImportQIF when creating the account button.
After the Converted.QIF file is saved it will say that is saved on the last line of the Run Tab.
If the Run Tab looks like this (buttons disabled):
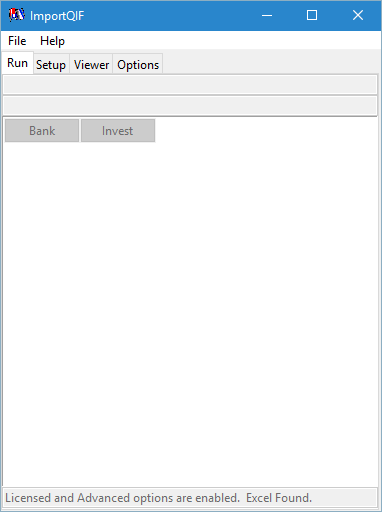
You have your accounts on the Setup tab, but have not yet loaded in the QIF/CSV/Excel/OFX/QFX file to be converted. This file can be loaded in either from the File -> Open… menu on ImportQIF or when you open a QIF/CSV/OFX/QFX file in your web browser or Windows Explorer if you have set ImportQIF as the default file handler for that file type. You can also drag and drop the file to be converted on the ImportQIF shortcut on your desktop.
Since ImportQIF never sets itself up for handling Excel files you will have to use the File -> Open menu in ImportQIF or you can use the Open With… menu available in Windows Explorer and in some web browsers, or the drag and drop on the ImportQIF shortcut.
Please note that conversion of CSV/Excel and OFX/QFX files is an advanced option that requires purchasing a license after the trial period.
If the Run Tab has no buttons you need to go to the Setup Tab and set them up there.
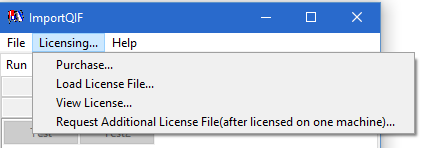
Quick note about licensing ImportQIF. The license of ImportQIF locks into a given machine so it needs to generate a computer code key that is used while purchasing an ImportQIF license. It is quite long, so you should use the Licensing... -> Purchase... to take you to the right web page and to fill in the computer code automatically. If you have purchased ImportQIF and need to install on another machine, or if something changes on your machine and the license is no longer valid, you can use Licensing... -> Request Additional License File...
Note you will need the User Id created for you from the purchase license to complete this request.
Since ImportQIF never sets itself up for handling Excel files you will have to use the File -> Open menu in ImportQIF or you can use the Open With… menu available in Windows Explorer and in some web browsers, or the drag and drop on the ImportQIF shortcut.
Please note that conversion of CSV/Excel and OFX/QFX files is an advanced option that requires purchasing a license after the trial period.
If the Run Tab has no buttons you need to go to the Setup Tab and set them up there.
Quick note about licensing ImportQIF. The license of ImportQIF locks into a given machine so it needs to generate a computer code key that is used while purchasing an ImportQIF license. It is quite long, so you should use the Licensing... -> Purchase... to take you to the right web page and to fill in the computer code automatically. If you have purchased ImportQIF and need to install on another machine, or if something changes on your machine and the license is no longer valid, you can use Licensing... -> Request Additional License File...
Note you will need the User Id created for you from the purchase license to complete this request.
If this web page doesn’t come up for any reason, you can do this manually by going to the Request Additional License File web page.
Run command line option
Once you have an account setup you can run the conversion entirely from the command line with these exceptions.
You can’t convert an investment account from CSV or Excel format.
You can’t use the column “Type” or "Filter" options for converting any account type from CSV or Excel format.
The reason you can’t do these conversions from the command line is in both cases ImportQIF might have to ask the user
questions about the data to do the right processing of those transactions.
The command line format is:
“C:\Program Files\QuicknPerlWiz\ImportQIF\ImportQIF.exe” –run AccountName InDataFileName [OutDataFileName]
AccountName is the same one used on the Setup/Run tabs.
InDataFileName is the full path to the data file to convert.
OutDataFileName is optional, and is the full path to the file name where you want the converted QIF file to be put.
If not provided the file named Converted.QIF will be put on your desktop or in the temporary or start directory depending on the Use Temp Folder for Converted.QIF or Use Start Folder for ConvertedQIF settings on the Options tab.
WARNING! In Quicken 2015 to 2016 R1-R7 if the follow options aren’t turned off, you will not see your transactions at all!
Automatically add to banking registers
Automatically add to investment transaction lists
Another thing that is strange is that if you are in the account at the time of the download you will not see the transactions. You will have to go to another tab or register and then come back to see the transactions.
Please note that cash and liability accounts work differently. Even when the Automatically add downloaded transactions to registers option is off you will not get to a chance to verify the transactions before they are added to the register.
You can change these options in Quicken by going to:
Edit -> Preferences -> Downloaded transactions -> Automatically add to banking registers
Edit -> Preferences -> Downloaded transactions -> Automatically add to investment transaction lists
Note in Quicken 2012 and above you can change this setting per account in the Ctrl+A -> Edit -> Online Services, and click on the Automatic entry… link.
Loading in Converted QIF file into Quicken (For if you are not using the automatic import into Quicken.