ImportQIF Account Setup
The install will create a shortcut on your desktop and in the Start menu (Under QuicknPerlWiz/ImportQIF)
You should run the program now to setup the account names and types you will be importing.
You can get help on this window and any of the other windows in ImportQIF by pressing F1.
When you run ImportQIF and no account names are setup, ImportQIF will default to the Setup tab.
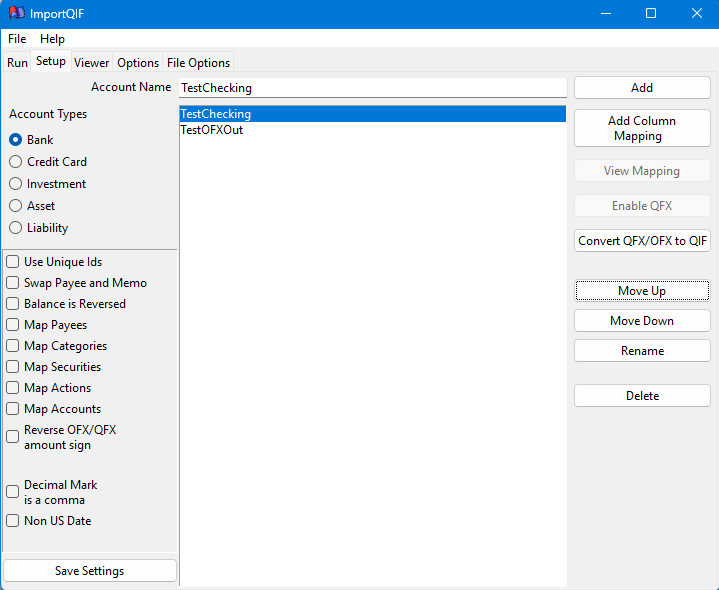
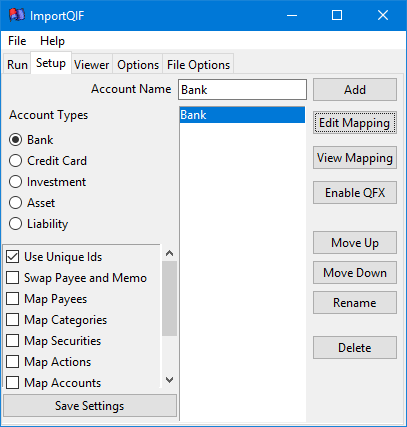
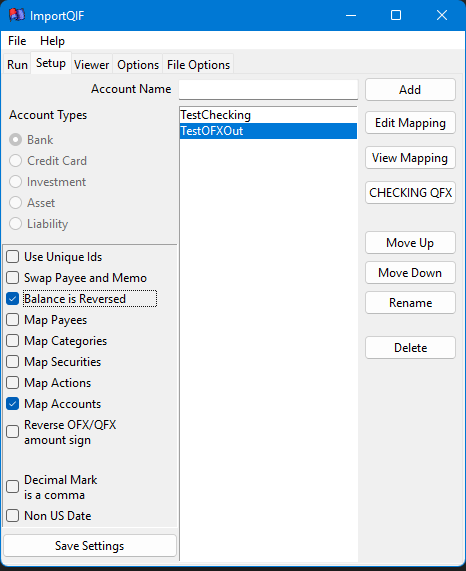
The Setup Tab is where you enter the account name and type, and if needed tell ImportQIF how to map CSV/Excel columns to Quicken©/QIF fields.
1. Type in the account name exactly how it is in Quicken. Note that if you are using Account Mapping then the account names come from the data file and as such it doesn't matter what name you give here. Also, it seems that in Quicken the account name is limited to 41 characters, but for the QIF import it is limited to 40.
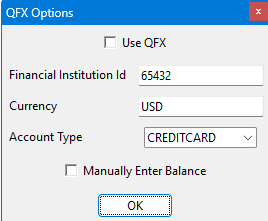
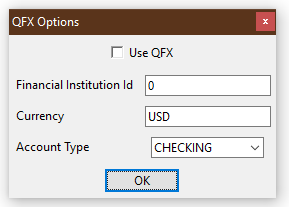
2. Pick the account type. If the output format is QFX, the account type is selected in the QFX dialog (shown below).
3. Select any options at the lower left if they are needed (see option descriptions below).
4. Select Add to add this account name/type which will appear in the Setup tab list, and as a button on the Run tab.
5. If you going to use a CSV or Excel file, then you will need to select Add Column Mapping (For details on non-investment account column mapping select here. And for investment account column mapping select here).
New Features: Convert QFX/OFX to QFX, Balance is Reversed/Running balance, Use Unique Ids, Swap Payee and Memo, Map Accounts, Map Categories.
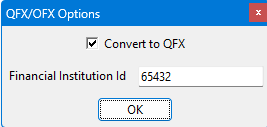
- Convert QFX/OFX to QFX (select Convert QFX/OFX to QIF button to toggle the setting), when the input file format is either QFX or OFX the user can choose to either output a QIF or QFX file. Note in the case of outputting a QFX file, the only thing done is add the extra information that is in a QFX file that isn’t in an OFX file. And in the case of a QFX to QFX file the only thing that is done is to change the financial institution Id. The OFX file may not import into Quicken if there is syntax in it that Quicken doesn’t understand. (Dialog shown below this list.)
- In the case of Excel & CSV to QFX conversions for non-investment accounts the user can map the running balance and ImportQIF will set the register/ledger/online balance to the running balance of the latest transaction.
- ImportQIF can now use unique ids to block duplicate transactions from being imported.
- User can now decide to swap the payee and memo on an account-by-account basis.
- In the case of OFX, QFX, or Excel & CSV files using the account column there can be multiple accounts in one data file. This feature can be used to map the names in the data file to what they are in Quicken. Note that in the case of OFX and QFX these are the account ids and are most likely not what you want for your account names in Quicken.
- You can use the Map Categories option/file to look up payees and add the category to the transactions. This is a substitute for Quicken’s use of the Memorized Payee List to do automatic categorization. Check out the details below and on the Options tab documentation.
OPTIONS (Note these options are per account, the general options are on the Options tab)
Use Unique Ids option tells ImportQIF to use unique Ids to block importing the same transaction twice.
You can control how long the unique ids are kept on the Options tab.
Swap Payee and Memo option tells ImportQIF to swap the payee's and memo in all the input data file formats except Excel and CSV. These two data file formats require the user to state what column of data to use, so you can already swap them when doing the column mapping. Note that the Swap Payee and Memo for all accounts option on the Option page will override what is selected on this option if it is set to Yes.
Balance is Reversed option tells ImportQIF that when using the running balance to set the online balance for Excel/CSV to QFX conversions on non-investment accounts that the newest transaction for any given day is the first transaction, not the last transaction.
Map Payees option
If you select the Map Payees option, ImportQIF will ask for you to setup a mapping from what the payee's name is called in the data file to what you want it to be called in Quicken/converted QIF file. The reason for this option is because Quicken doesn’t apply its renaming rules to QIF imports. Note that you will have four options, Contains, Starts_With, Exactly, and Reg_Exp (regular expression). Most people will use Contains or Starts_With. Regular expressions are powerful, but hard to get right. The file that these mappings are saved in can be changed on the File Options tab.
Map Categories option
If you select the Map Categories option and the transaction doesn’t already have a category, ImportQIF will ask for you to setup a mapping from the payee name (after the payee mapping is done, if requested) to what category you want in the transaction. Note that you will have four options, Contains, Starts_With, Exactly, and Reg_Exp (regular expression). Most people will use Exactly, this will perform in the same way Quicken’s automatic categorization from the Memorized Payee List works. Regular expressions are powerful, but hard to get right. The file that these mappings are saved in can be changed on the File Options tab. Also, there is a Merge button you can select to merge the payees/categories from Quicken’s Memorized Payee List. It is suggested you use it before you try to use this feature for the first time, so that you have a starting list of payees to categories.
Map Securities option (For QIF or CSV/Excel investment transactions only)
If you select the Map Securities option, ImportQIF will ask for you to setup a mapping from what the security name is called in the data file to what you want it to be called in Quicken/converted QIF file. The file that these mappings are saved in can be changed on the File Options tab.
Map Actions option (For CSV/Excel investment transactions only)
If you select the Map Actions option, ImportQIF will ask for you to setup a mapping from what the action name is called in the data file to what you want it to be called in Quicken/converted QIF file. The reason for this option is because some financial institutions put garbage that keeps changing, in the action field. Like Div paid on 2/1/2016. Note that you will have four options, Contains, Starts_With, Exactly, and Reg_Exp (regular expression). Most people will use Contains or Starts_With. Regular expressions are powerful, but hard to get right. The file that these mappings are saved in can be changed on the File Options tab.
Map Accounts option (For OFX, QFX, CSV, and Excel data files that are setup for to allow multiple accounts in one data file)
If you select the Map Accounts option, ImportQIF will ask for you to setup a mapping from what the account id/name is called in the data file to what you want it to be called in Quicken/converted QIF file. Note for Excel/CSV files you must map at least one column with Account. The file that these mappings are saved in can be changed on the File Options tab.
NOTE that when one of these “Map” options are active, ImportQIF will prompt while reading the data file for any payee/security/action/account it doesn’t find in this CSV file, and allow the user to add it at that time. So, it is not necessary put in all payee/category/security/action/account names to start with. But the user is free to edit the CSV files directly (Entering your Quicken renaming rules is a good start for the payee mapping option. Unfortunately, there is no way for ImportQIF to read the renaming rules like it can do for the Memorized Payee List.).
Reverse OFX/QFX amount sign Some financial institutions have been known to reverse all the amount signs in OFX/QFX transactions even though the OFX standard clearly states how these sign should be done, as in in reference to the user’s account, not from the financial institution’s point of view. This will reverse all the amounts (make positive amounts negative, and negative amounts positive). This option only applies to OFX and QFX files, and only for cash transactions.
Comma Decimal Mark option will translate amounts from this format 100.000,00 to 100000.00, which is what the US and Canadian versions of Quicken needs in their QIF files.
Non-US Date option (for QIF files only)
Quicken US/Canada QIF import will only accept dates in the MM/DD/YYYY format, so for dates in the DD/MM/YYYY format you will not be able to import them in the Quicken US/Canada without translation. The non US date is expected to be in DD/MM/YYYY or YYYY/MM/DD. The format is fairly flexible. All of the following would work: 31/1/2010, 31-01-10, 31.1.2010, 21/01/90, 1999-1-31. Note if you use YYYY/MM/DD format the year has to be 4 digits.
Determining what options are selected for a given account.
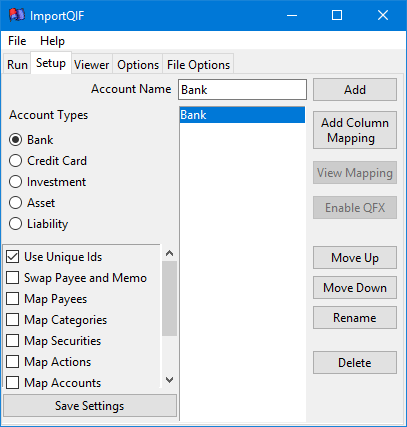
If you select an account name in the list, it will show you which options have been set.
Note that if there is no column mapping data, you there will be an Add Column Mapping button. Once column mapping data has been added to the account it will change to an Edit Mapping button.
You can change the account type and/or the options of an account, by selecting the account in the list, changing the options and then select Save Settings, to save these.
Adding Column Mapping (details for non investment account column mapping, and details for investment account column mapping)
Select the Add Column Mapping button (You have to select this button for CSV/Excel data files)
For CSV/Excel files the user needs to tell ImportQIF what the columns in the data file map to in Quicken/QIF file.
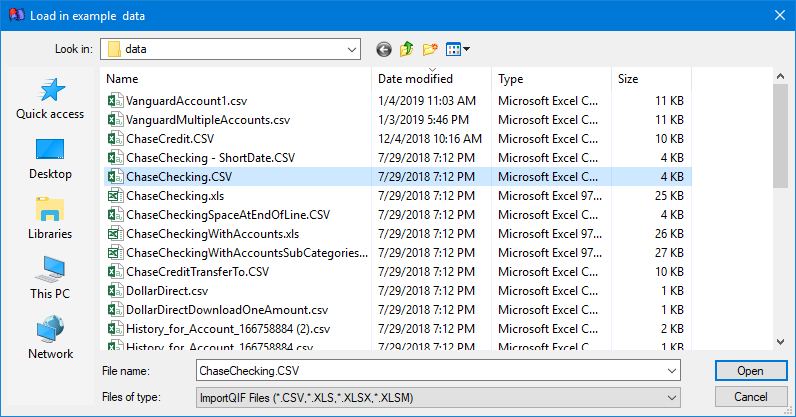
ImportQIF will bring up a dialog for you to browse for an example CSV/Excel file.
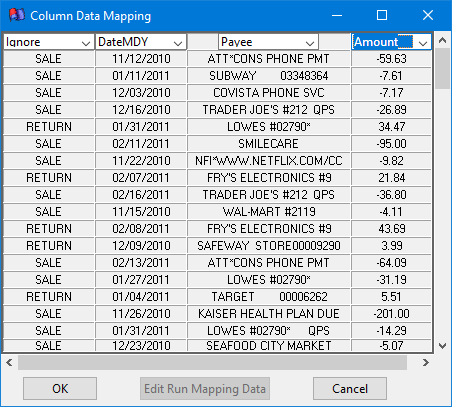
After opening the example data file, ImportQIF will bring up the Column Data Mapping window.
The idea here is to tell ImportQIF which columns to use for what purpose.
details for non investment account column mapping, and details for investment account column mapping
d
After your created a column mapping (if needed) you can use the Edit Mapping and View Map buttons to change/view the column mapping.
details for non investment account column mapping, and details for investment account column mapping
d
After your created a column mapping (if needed) you can use the Edit Mapping and View Map buttons to change/view the column mapping.
The Edit Mapping button will bring up the same Column Data Mapping dialog shown above.
The View Map column mapping is shown below.
The View Map column mapping is shown below.
Here is a couple of examples with the Type and Filter data (Explained in the Edit Run Mapping Data documentation)
Output a QFX file instead of a QIF file
There are two possible ways to get a QFX file as the output. If the input data file is QFX or OFX format you can choose to have ImportQIF add the needed information to make it a QFX file using the Convert to QIF button (which will toggle to Convert OFX to QFX when it is in that mode). It the case of an input file of QFX the only thing that is going to be changed is the financial institution’s id. Note that nothing else in the QFX/OFX file is changed so it is possible that Quicken might reject importing the QFX file for syntax it does understand in the original QFX/OFX file. Note that the setting of the financial institution’s Id is the same as described below for the second possible use case.
The other possibility is for when the input data file is in CSV or Excel format and is explained below.
Select the Enable QFX button to setup using a QFX output file instead of a QIF file for importing into Quicken.
Note that your version of Quicken must be supported by Quicken Inc for this to work.
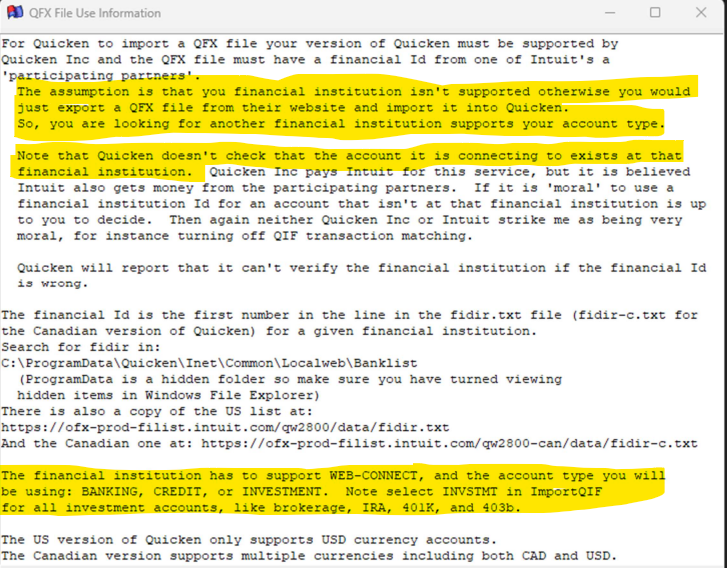
The first time you select this you will get the following explanation.
Select the Enable QFX button to setup using a QFX output file instead of a QIF file for importing into Quicken.
Note that your version of Quicken must be supported by Quicken Inc for this to work.
The first time you select this you will get the following explanation.
You need to fill in the financial institution Id.
So, you can copy and paste it that path to find the fidir.txt (fdir-c.txt for the Canadian version of Quicken) file is: C:\ProgramData\Quicken\Inet\Common\Localweb\Banklist
US online copy: https://ofx-prod-filist.intuit.com/qw2800/data/fidir.txt
Canadian online copy: https://ofx-prod-filist.intuit.com/qw2800-can/data/fidir-c.txt
Note that the QFX format has account types for Checking and Savings, whereas the QIF format just uses Bank.
Select the Use QFX checkbox to enable outputting a QFX file instead of a QIF file.
Note that the QFX format doesn’t allow for categories or for split transactions.
Categories must be added by Quicken, and you need to either pre-enter split transactions and match them to the imported ones, or manually split them after importing.
Shown below with QFX mode enabled.
