ImportQIF File Options
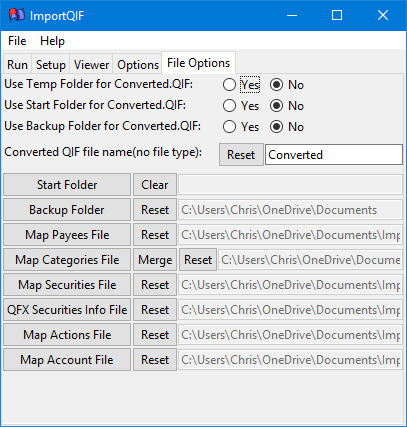
Use Temp Folder for Converted.QIF tells ImportQIF to use your temporary file for the Converted.QIF file, instead of your desktop.
Use Start Folder for Converted.QIF tells ImportQIF to use what you have set the Start Folder option to be, for the Converted.QIF file, instead of your desktop. Note that if Start Folder has not been set, this option is ignored.
Use Backup Folder for Converted.QIF tells ImportQIF to use what you have set the Backup Folder option to be, for the Converted.QIF file, instead of your desktop.
Converted QIF file name(no file type) lets the user change the file name used for output QIF file instead of the default Converted.QIF. Don’t include the .QIF file type, it will be added automatically. You can also use %a in the file name and ImportQIF will change it to the account name used on the Run tab. You can also use %d in the file name to have ImportQIF add in the current date and time.
Start Folder tells ImportQIF what folder you would like to start in when you select File -> Open…
Map Payees File is the name of a CSV file that is used to translate payee names from what they are in the data file to what the user wants their names to be in Quicken/converted QIF file. The reason for this option is because Quicken doesn’t apply its renaming rules to QIF imports. The format of this file is the first column is the text needed to match the payee in the data file. The second column is what it should be translated to. And the third column is either Contains, Starts_With, Exactly, or Reg_Exp. The third column controls how the text in the first column is used to match the payee in the data file. Most people will want to use either Contains or Starts_With. Note that if there isn’t a third column in a line of the CSV file, Starts_With will be used. If you put the account name in the fourth column, then this rule will only apply to that one account. There is now an option on the dialog for restricting this mapping to a given account. The use of this file is turned on and off with the Map Payees option for the account, which is set on the Setup tab. The default is ImportQIFPayeesMapping.csv in your Documents folder.
Map Categories File is the name of the CSV file that is used to determine what category should be used for a given transaction based on the payee name in that transaction. The main reason for this option is that Quicken 2018 has currently broken the QIF import and is putting transactions directly into the register without matching existing transactions or payee in the Memorized payee list. This file/option is used to perform the same function as the Memorized Payee List in Quicken for filling in the category based on the payee name in the transaction. Note this doesn’t help Quicken 2018’s problem of not matching existing transactions. If you select the Merge button, ImportQIF will merge payees/categories from Quicken’s Memorized Payee List to this file. If the payee/category already exists in ImportQIF’s file, the category in Quicken’s Memorized payee list will be used. Also, for the case where the Memorized Payee List has multiple categories per payee, the first one in the list will be used. The format of this file is the first column is the text needed to match the payee in the transaction (after the payee has been mapped, if requested). The second column is the category you want for this payee. And the third column is either Contains, Starts_With, Exactly, or Reg_Exp. The third column controls how the text in the first column is used to match the payee in the data file. Most people will want to use Exactly, because that is what Quicken uses. Note that if there isn’t a third column in a line of the CSV file, Exactly will be used. If you put the account name in the fourth column, then this rule will only apply to that one account. There is now an option on the dialog for restricting this mapping to a given account. The use of this file is turned on and off with the Map Categories option for the account, which is set on the Setup tab. The default is ImportQIFCategoriesMapping.csv in your Documents folder.
Map Securities File is the name of a CSV file that is used to translate security names from what they are in the data file to what the user wants their names to be in Quicken/converted QIF file. The format of this file is the first column is the security name as it exists in the data file. And the second column is what it should be translated to. The use of this file is turned on and off with the Map Securities option for the account, which is set on the Setup tab. The default is ImportQIFSecuritiesMapping.csv in your Documents folder.
QFX Securities Info File is the name of a CSV file that stores the security information that will be needed for a given security while in QFX output mode. The file has three columns. The first is the security name (it uses the resulting name of the security name matching if the Map Securities option is on). The second is the security type, which can only be Stock, Mutual Fund, or Option. The last is the CUSIP Id (note if a CUSIP Id doesn't exist for this security you can use any unique Id). The last is the CUSIP Id (note if a CUSIP Id doesn't exist for this security you can use any unique Id). Note that if the security doesn’t exist in Quicken it will be created when the QFX file is imported into Quicken. Since Quicken doesn’t allow changing a security’s CUSIP Id this how you would get a security into Quicken with the CUSIP Id set.
Map Actions File is the name of a CSV file that is used to translate action names from what they are in the data file to what the user wants their names to be in Quicken/converted QIF file. The reason for this option is because some financial institutions put garbage that keeps changing, after the action. Like Div paid on 2/1/2016. The format of this file is the first column is the text needed to match the action in the data file. The second column is what it should be translated to. And the third column is either Contains, Starts_With, Exactly or Reg_Exp. The third column controls how the text in the first column is used to match the payee in the data file. Most people will want to use either Contains or Starts_With. Note that if there isn’t a third column in a line of the CSV file, Starts_With will be used. If you put the account name in the fourth column, then this rule will only apply to that one account. There is now an option on the dialog for restricting this mapping to a given account. The use of this file is turned on and off with the Map Actions option for the account, which is set on the Setup tab. The default is ImportQIFActionsMapping.csv in your Documents folder.
Map Account File is the name of a CSV file that is used to translate account ids/names from what they are in the data file to what the user wants their names to be in Quicken/converted QIF file. The format of this file is the first column is the account id/name as it exists in the data file. And the second column is what it should be translated to. The use of this file is turned on and off with the Map Accounts option for the account, which is set on the Setup tab. The default is ImportQIFAccountsMapping.csv in your Documents folder.
NOTE that when one of these “Map” options are active, ImportQIF will prompt while reading the data file for any payee/security/action/account it doesn’t find in this CSV file, and allow the user to add it at that time. So, it is not necessary put in all payee/security/action/account names to start with. But the user is free to edit the CSV files directly (Entering your memorized payees is a good start for the payee mapping option).
The next part of ImportQIF to look at is the Run tab.