ImportQIF CSV/Excel Investment Column Data Mapping
Limited to basic transaction types, no support for transactions like options
Added support for Cover for short sale and Sell short, see new dialog near the end of document
First off I want to let you know that this process might be difficult because there is in fact no standard on what data financial institutions put in CSV files, and as such you are basically teaching ImportQIF how to deal with your financial institution’s data. I’m going to go through the data I do have, which is from a Fidelity IRA, Vanguard regular IRA, and a Vanguard brokerage IRA so that you can see how this should work. I would like to have feedback if you use this feature. What works? What doesn’t? What would you like to see? Would you be willing to supply example data? Thanks.
I want to point out that the quality of this conversion is going to depend on the quality of the data the financial institution provides. And as you will see as you go through these examples that leaves a lot to be desired. I highly recommend you go through all the examples from top to bottom to understand as much as possible about what you are facing.
This step is the process of telling ImportQIF what each column is. The possible choices are:
Ignore -> Ignore column
Action -> Some times called Transaction Type, basically a hint at what type of transaction this is
DateMDY -> Transaction date in formats like MM/DD/YYYY, 12-31-2011 (Year can be two digits)
DateDMY -> Transaction date in formats like DD/MM/YYYY, 31-12-11
DateYMD -> Transaction date in format like YYYY/MM/DD, 2011-12-31
Description -> Description of the transaction, this will be put in the QIF/Quicken’s description field.
Net Amount -> Amount after all the fees have been added in the case of a buy (expressed as a negative amount). Or in the case of a sell it is the amount reduced by all the fees.
Gross Amount -> Is the Net Amount with some unknown fees added into it.
Price -> Price per share
Security -> The investment name
Shares -> The number of shares of the security, sometimes called Quantity.
Fees -> Commissions and other fields like SEC fees, more than one column can be marked as a fee.
Memo -> Any other text they might include, this will be put in the QIF/Quicken’s memo field.
Account -> You can use the Account column to decide what account to import a given transaction into. You should make sure you have created the accounts in Quicken before importing. If they are created by the QIF file import they might not have the right account types. The Map Accounts option on the Setup tab must be on to get ImportQIF to use this column.
Filter -> You can use the Filter column to filter out transactions that you don't want. Normally this would be some kind of status and ImportQIF will prompt you for each "status" it encounters in the data file, for whether you want to filter it out or not.
At minimum you need to select a column for each of these:
Date, Security, Net Amount, Shares.
Note I found that Vanguard was putting a fronted load in the Gross Amount column, and that fee wasn't in the Net Amount column. So, the Gross Amount column really needed to be used for the buys, but not the sells. And since that is what they were calling the columns that is what I started calling the columns. Even though gross and net might have different meanings in other contexts.
Also, there is a Compute pull down menu, as shown below.
It is a very common practice for financial institutions to leave out the fees, even when they do put in say the commission, they leave out SEC fees, but include them in the net total (Net Amount column from above).
ImportQIF has three “compute” options. The default is Fees.
The next one is Price.
Sometimes the prices column is missing or not accurate. By selecting price on the Compute menu it will compute the price, but note since the way to compute this is amount = shares * price + fees, there is no way to compute both prices and fees at the same time. So, to get accurate numbers there will have to be one or more “Fees” column(s) selected (and all the fees have to be in these columns), or there has to be no fees.
If you select None from the Compute menu then ImportQIF will not try to compute anything and you will get whatever is in the data columns and what you have selected.
Fidelity IRA example:
Above I have picked the column types to match the data. I think most are pretty self explanatory. Please note that you need the security name not the symbol, so I just put the symbol in the memo field just because I thought I might as well keep it. In the case of Fidelity, the “security description” of the security is in fact the name of the security. Security type might be something for if you bought on margin or something, which ImportQIF is not going to deal with.
A special note about fees. I have found that some fees are actually left out in some data, but are in fact included in the net amount, so if you marked all the fee columns and added them up they would not give you the right result. So what I have done is not to mark any fees columns and instead use the compute Fees pull down menu, so ImportQIF will calculate what the fees are based on how much the buy/sell of the security cost from the net amount. Now you will notice that there is both a Trade Date and a Settlement Date. The reason for choosing the Trade Date is because it is always filled in, where as the Settlement Date is not, and besides that is really the official date for the trade for tax purposes and such.
Select OK to save the column mapping.
Running the conversion: (Please see the documentation on the Run tab for how to load and run the conversion)
When you actually load in the data and run the conversion, ImportQIF is going to ask you some questions about the data, because in fact information above is not enough to tell what is needed. First off the “Actions” are not the same from financial institution to financial institution, and not even from one account type to another. Second the Action can only best be described as a hint. For instance in the case of Fidelity you see Dividend Received, which means you get cash, and then the Reinvestment is actual a buy. In the case you will see below from Vanguard they use Dividend on both the getting of the cash and on the next transaction that does the buying of more shares. Note that the “actions” shown in the above data are a prime example of why you might want to use the Map Actions option on the Setup tab. They have YOU BOUGHT and then basically a memo after that. The Map Actions option allows you to use wildcards to rename action name data like that to something consistent, like Bought.
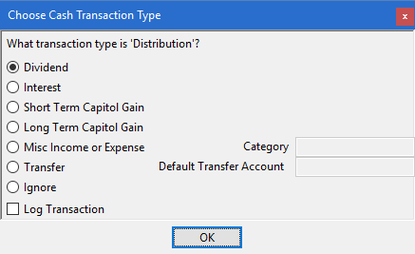
In the dialog below ImportQIF is asking me about the DIVIDEND RECEIVED action. Notice that it says “Choose Cash Transaction Type”. This is important, the fact that it is “Cash” means that no shares of a security are being bought or sold. Selecting Dividend is the right choice for this action. For Cash transactions ImportQIF will ask what is needed for each action, and will store this information and will not ask you again for it. To retrain ImportQIF you have to either delete the account on the Setup tab, and start over, or use Edit Mapping -> Edit Run Mapping window to delete the action mapping.
Also notice the “Misc Income or Expense” I don’t have a screenshot for this one, but it is pretty clear what it is for. If the amount is negative it will be an expense and an income otherwise. You can also put in the category that should be used. If a category is not selected Quicken will default the category to Misc.
Now the next dialog shows:
Now the next dialog shows:
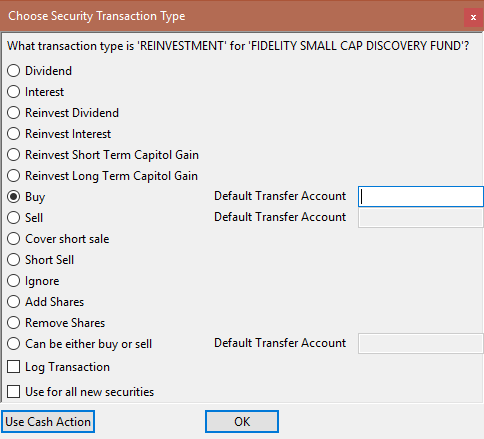
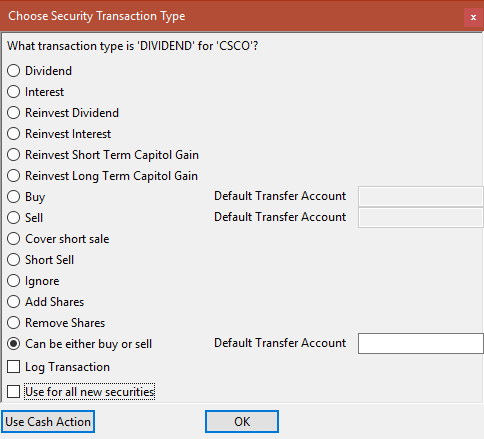
This one you will notice is “Choose Security Transaction Type” so there is some kind of buy or sell of the security. And notice it tells you what the security is. ImportQIF will ask what the action means, for each action and security combination. In this case I want to select “Buy”. Maybe not what you expected? Well the Reinvest Dividend or Reinvest Interest transaction is for when the financial institution did this in one transaction, as in they gave you’re the dividend and purchased the new shares in one transaction (so the cash amount in your register did not change). In this actual case it was done in three transactions, they gave the long term gain (in cash), and then the short term gain (in cash), and then they bought the shares using the cash that is now in the account. You need to look at your statements and be very sure how your financial institution does this. And note that it can be different for different securities and for account types. For instance you might have another security that you don’t even reinvest the dividend at all, so there would be only the cash transaction(s). Or in another account it does record it in just one transaction.
Which brings me to the Use for all new securities option shown in the dialog. If there is an action that you know is going to be the same for every security, you can select this option, and ImportQIF will not ask you for future securities.
If you want to log the transactions for this action, you can select the Log Transaction option.
Next One
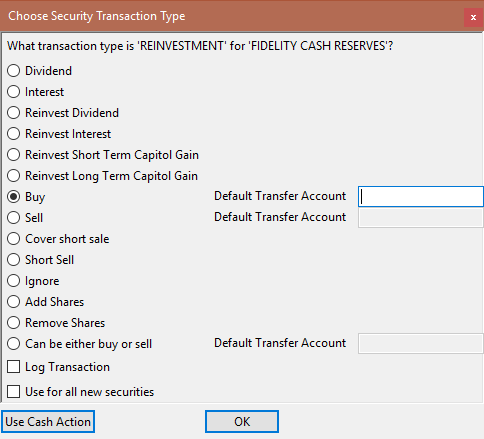
A special gotcha with Fidelity I noticed is that they always use “Fidelity Cash Reserves” for “cash”, and they seem to generate the needed, buys and sells for this security when they are paying dividends and such, but when I sold another security and the money was in fact put into “Fidelity Cash Reserves”, they didn’t put in the buy for these leaving the amount in the register’s cash amount so you have to either put in the missing buy or add the cash balance and the “Fidelity Cash Reserves” in the portfolio to get the right amount or maybe just remove the “Fidelity Cash Reserves” transactions altogether and just use the register’s cash amount.
Vanguard IRA example:
Vanguard IRA example:
The first few rows are totals not transactions, we are not interested in them. Notice the date is in MM/DD/YYYY (DateMDY) format. The “Transaction Type” is the “Action”. They provided a description so I mapped it to the QIF/Quicken description. The “Investment Name” is the name of the security. There is nothing too surprising here, but what about that “Gross Amount field”?
Well it turns out that Vanguard has an interesting twist here. If you have to pay a front load fee to buy a security they include it in the Gross Amount, not in the Net Amount. But on the other hand for when you have fees like commissions and SEC fees they are reflected in the Net Amount. And speaking of fees you will notice there are no columns for fees, even though they in fact do have fees included in the Net and Gross amounts. So in fact ImportQIF needs to know about both columns to get the fees right. The only way you know that you need the Gross Amount column is by close inspection of the column data noticing that it does include fees on a buy of some securities.
Running the conversion:
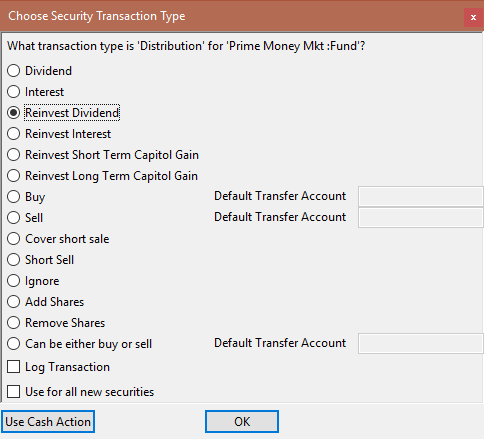
Here is great generic term “Distribution”. What in fact it is they are “distributing” is a dividend. If you look back at the Transaction Description there is a hint there in “INCOME DIVIDEND”. And as it turns out unlike the Fidelity example this all done in one transaction, as in they are giving a dividend and reinvesting it in one transaction. So the correct transaction type for “Distribution” for this security is “Reinvest Dividend”. Why did I say for this security? Because you might have another security that gives interest instead of dividends, or you might not have it set to reinvest the dividend, and in that case it will actually be a cash transaction.
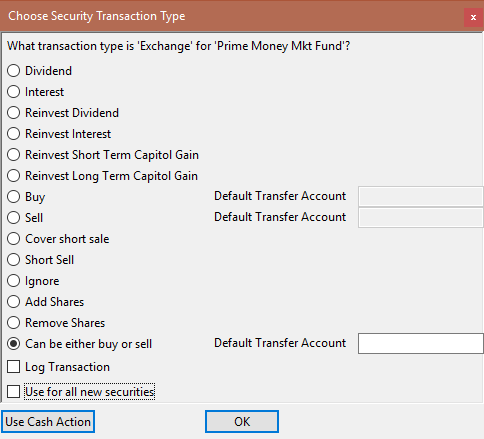
Now here we have this great “Exchange” action. Not exactly the most precise action, it is in fact used when they are talking about selling in one fund. And then in the next transaction they will turn around and Exchange again to buy in another fund. The action doesn’t tell us which it is, but luckily by looking at if they added shares or removed share ImportQIF can tell the difference, so the correct answer for the “Exchange” action is “Can be either buy or sell”.
Now for this one:
Now for this one:
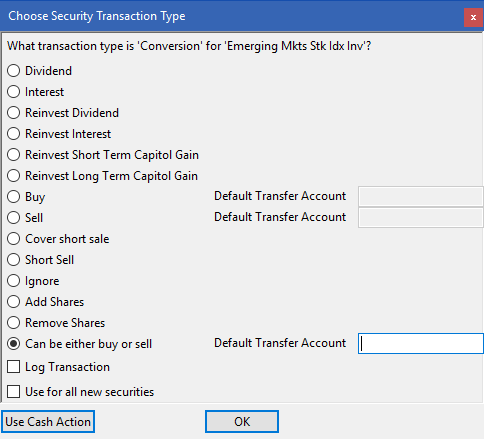
Well in fact ImportQIF will probably not handle this action “Conversion” correctly. Since the only choice you can pick here is “Can be either buy or sell”, and ImportQIF will turn these into Buys and Sells, which I think might give you the wrong cost basis, even though you will have the right number of shares.
Vanguard Brokerage IRA example:
Vanguard Brokerage IRA example:
Now given the other examples what is important in this one? Well you see there is a “Principal Amount”, but I choose to ignore it, unlike the “Gross Amount” in the last account. How did I know to do this? Well the answer really comes down to the fact that in this case if I look at the Principal Amounts they never have any fees included in them, the Gross Amounts did. If I mistakenly marked the Principal Amounts as GrossAmount, what would happen is that the buy fees that are in the NetAmount would not be included. If the column is in fact a column that includes fees like in the example above and I didn’t mark it with the GrossAmount I would be missing the fees from that column.
Running the conversion:
Running the conversion:
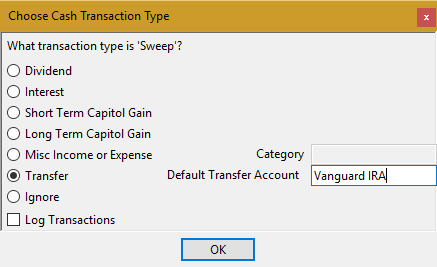
This “Sweep” action is in fact a transfer. And because of the fact that the Vanguard IRA and the Vanguard Brokerage IRA are actually connected that is where the transfer is going to go to or come from. Notice it says “Default Transfer Account”. You can’t change the account once set (you can use Edit Mapping -> Edit Run Mapping Dialog to delete the action mapping). If it isn’t the right account you will have to go in and change the account after it is imported into Quicken, so use the account that it is most likely to be transferred to.
Does Vanguard have a gotcha? Well I do notice that they name of the security they use in the CSV column data is a truncated form of the full security name, to that is a bit of a pain. You can use the Map Securities option on the Setup tab to have Quicken ask you what all the security names should be, so that is one way to fix it up.
Please note that Quicken will create a new security on the fly if it doesn’t have one with the same security name and as such if you rename the security created by the QIF import, it will end up creating it again.
When a security is created by the QIF import you need to go in and edit the security for the right symbol and other information.
Cover for short sale and sell short (as of Import 2.5.12.0)
The Cover short sale and Short Sell. Cover short sale is a special kind of buy, and Short Sell is a special kind of sell. I’m not going to go into the details of what they mean from an investment standpoint since if you need to use them you should already know what they mean.
Please note that ImportQIF will remember your mapping for each account/security/action, but if you buy a given security both long and short in the same account, and your broker uses the same action name for both then it is clear that one of them is going to be mapped to the wrong Quicken (QIF) action. You should pick the one you are going to do more often, and then fix the other ones in Quicken after then are imported.
Use Cash Action (as of ImportQIF 3.2.0.0, and for Excel/CSV files only)
Normally ImportQIF will decide if an investment transaction is a cash transaction by the fact that there are no shares
on that row of data. Some brokers are actually putting in a cash dividend, and specifying the security and the number
of shares that the dividend is being paid on. To allow the use to map these kinds of transactions, a new button has been
added to the security action mapping dialog, Use Cash Action. If you select Use Cash Action it will bring up the
cash action mapping dialog to allow you to use the cash actions instead of the security based actions.
For the next part of ImportQIF to look at the Options Tab.


